Saturday, May 9, 2015

Intrducing a 3D printer to my daughter's Kindergarten class

We had fun showing off my 3D printer to the Kindergarten class.  Although the printer is fun to watch, kids tend to get board with it in just a few minutes.  I like to come up with classroom projects that let the kids use things that are printed with the printer. Since it is so cheep it is also fun to print something ahead of time that they can take home.

For the kindergarten class we printed some flowers that the kids could use to put together a cut spring  time flower pots just in time for mother's day:
 
It even lights up:
The kids had a great time. Here are some pictures


Turned out to be a lot of fun.  If you are interested in makeing your own here is a list of instructions on Instructables:

http://www.instructables.com/id/Spring-kindergarten-Class-Project-with-3D-Printer/

And the 3D files on YouMagine:

https://www.youmagine.com/designs/light-up-flower

Saturday, May 2, 2015

Ultimaker 2, cleaning a clogged nozzle

So my Ultimaker2 extruding head got clogged, really bad.  Something got jammed while printing and I could not get the filament to feed.  This had happened once in the past when I tried using some really cheap filament but I am not sure the real root of the problem this time.  In any case, I found using the "atomic" method for getting a clean nozzle. This method is named after MostlyAtomicBob who described the method for the first time in the following post:

http://umforum.ultimaker.com/index.php?/topic/3561-ultimaker-2-extruder-nozzle-blocked/#entry28940

Here is a summary of the steps that I used:

1) Remove the boden tube from the printer head
2) Heat up the head to full temperature (around 210 degrees) 
3) Push in a piece of spare filament until I can no longer push or it starts coming out the end.
4) Reduce temperature to around 90 degrees. Filament should solidify but stay a little soft.
5) Pull the filament out of the print head.
6) Repeat steps 2-5 until I get completely clean filament

You can see the result of my cleaning in the picture below. The pieces are a little backward and ordered from right to left.  Note the really dark char slowly going away and the pieces getting longer as they nest better and better in the print head. 


Here is the same procedure when it clogged a second time. This time I remembered to order them from left to right.


- Dirk

Electric box extender

I have been having trouble with my 3D printer over the last couple of months. It turns out that the fans got disconnected. Once I fixed the problem my printer is working better than ever. I was itching for something to print so I came up with this simple spacer.

I installed a motion sensor in my basement because the light switch is in an inconvenient place and most of the time we go in this part of the basement my hands seem to be full. The motion sensor fixes this problem and even found a outlet plate on thingiverse that fit perfectly.

The only problem is that the installed switch box is too small for the new sensor and my printed play sticks out a good 15 mm from the box.


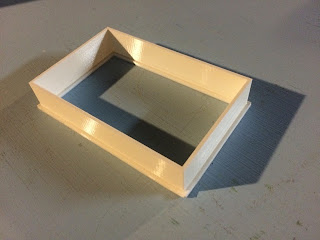
A few minutes with OpenScad and a two hour print later I have a nice looking solution.


Here is a link to the OpenSCAD file if you are interested in printing your own:

https://www.youmagine.com/designs/wall-switch-spacer

Easy and fun! Nice to have my printer back!

- Dirk


Friday, April 3, 2015

April 1st Brownies

An oldie but a goodie with a modern twist. This year I printed out the letter E on my 3D printer using Brown PLA plastic.


Then I put the Brown E's in a baking pan:


Cover with aluminum foil and tell the kids I made brownies for them.


The were a little disappointed but then quickly got into the spirit of the day and played the same joke on their mom and nanny.  I even took some "sugar free" brownies into the dentist with me and gave some to my brother and his house mates.  

Happy April fools day.

- Dirk

Thursday, December 25, 2014

3D Cookie Cutter app comparison

My oldest daughter is in her second year of Brownies.  My wife and I volunteered to lead a couple of their meetings with a maker theme.  I thought the 3D printer is always a hit and what better project for girl scouts than cookies (yes I realize this is cliche but it is still fun).  I did some searching on the internet and came up with a variety of ways the girl scouts could design cookie cutters.  However, I had a checklist of desires and none of them quite made the "cut" (I will stop now).  Here is what I was looking for:
  1. An option to upload and trace a picture. This is necessary because I do not have enough computers for the group. I saw a similar activity at the Detroit Maker Faire and I thought hand drawn images would be more natural.
  2. Ability to add both internal and external features on the cookies. What I would really like is two layers so the cutters could imprint on the cookie as well as cut through the cookie. 
  3. Ideally an online app so I do not have to download anything.  
  4. Obviously an easy way to output stl files I could use with my printer.

CookieCaster: http://www.cookiecaster.com/#editor
Online app for drawing outline of cookie cutters.  This makes for a fun group project because you can scan and upload hand drawings into the editor and trace them.  The downside is that this editor only does a cookie outline and not the insides. Here is an example we did:

Cookie Cutter Editor: http://www.local-guru.net/blog/pages/cookiecutter-editor
Downloadable cookie cutter editor. Uses a programming language called processing (written in java).  I could not get the MacOS stand alone version to work so I tried to download processing and run the source directly.  Still was missing some libraries so I gave up on it.  Looking at the examples I do not think it would work much better than CookieCaster and could not get any of the internal details I wanted anyway.

Thingiverse: http://www.thingiverse.com/apps/customizer/run?thing_id=116042&code=2633da7762519236fd52412f6c8bf143

Thingiverse has one of their customizable apps.  This one was really nice because it could do some internal details. Seems to only have one height but having details is better than the other two.  However, this app also only had an option for online editing and no way to upload a picture.  It was also a difficult interface to master.  For example, it does not handle overlapping editing very well and was particularly hard to get right with my laptop's touchpad.  Here is an examples we made:

http://www.thingiverse.com/apps/customizer/run?thing_id=116042

Although none of the apps seem like they would work, none of them really fit all of my criteria.  I am going to have the girl scouts use Cookie Caster since it is the one that works with pictures. Please stay tuned for future blog posts with details highlights from the girl scout projects.

- Dirk

Friday, November 28, 2014

Snowflake Lithophane

There is something magical about looking at a lithophane.  I like handing them to people with the light coming from the front.  Most of the time they are polite and say, "that's nice."  Then I have them hold the lithophane to let the light come in from the back and the image pops out.  "Wow," "cool" they say and the expressions on their faces are ones of awe and surprise.

For christmas this year, my wife came up with the idea of putting a picture of the kids inside of a lithophane inside of a 3D printed snowflake.


Took a while to figure out but got much easier when I found an openscad program to generate snowflakes I found on Thingiverse:

http://www.thingiverse.com/thing:74322

I picked a random seed that fit well with my idea and then I tried importing my the stl file from my lithophane program.  I could not quite git it to work. So, instead I decided to make the print in two parts and glue them together. I did some minor modifications to the openscad file add an area for the lithophane, the hole for a ribbon and in latter modifications a way to add the year:


You can download the stl file for the frame on youmagine:


Now I just print the lithophane separate from the frame and it turns out quite well.  Here is a video:
I am happy to share any of the code or you can just upload a photo and order one of these on our etsy store:

https://www.etsy.com/shop/familyheART

I wife has challenged me to do something similar with a heart for valentines day.  That should be fun.

- Dirk

Lithophanes

I saw my first 3D printer when I was visiting the University of Notre Dame.  It was over 10 years ago, it was fairly expensive to operate and it printed in a kind of expensive wax.

Anyway, this was the first time I saw a lithophane.  It was a picture of Marilyn Monroe that just popped out if you held it so up to a light so that it is backlit.  It was just so cool that I really wanted to make some Lithophanes when I got my 3D printer.

Once I finally found some time I did some research and there were a few programs on the web which would make lithophanes for me.

http://maker.dongguk.edu/webclient/cylinder_litho_index.html
http://www.thingiverse.com/thing:74322

I tried a few but nothing excited me so I just wrote one myself.   I am very pleased with the results:


If you just want a lithophane, we added them to my wife's etsy store:

https://www.etsy.com/shop/familyheART

If you already have a printer I am happy to send you the MATLAB code to generate these for yourself.  However, I must warn you that it is not very robust and I am reluctant to post it until I can add a bunch of error checking and a little better user interface.  It's also written in MATLAB, ideally I would like to change to something like Python but I am just quicker working with MATLAB.