Saturday, July 19, 2014

Bug bots

I like the simple fun of bushbots; little robots, typically made with toothbrush heads, that use a cell phone vibrating motor to scoot around a table (you can buy kits here: http://www.makershed.com/products/brushbots).  I decided that this would be a great project for me to do with my kids.  Step one was to find the parts.
  1. Cell phone motors (pack of 50). 
  2. Batteries. Large pack ordered on amazon: http://amzn.com/B0043SAFK0
  3. Glue
  4. Double sided tape
  5. Toothbrushes
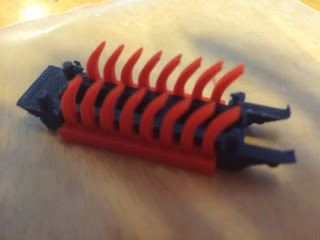
Between the motors and batteries, the price per brushbot was getting expensive.  So Instead of buying a bunch of toothbrushes I decided to see if I could print the body instead.  I came across the following design on thingiverse that did exactly what I wanted:


I ended up using only the "legs" and the body.  I also think it was also better to assemble the body upside down. In any case, I was able to print out these three parts and just let the kids assemble them using superglue:
Then we had to strip the wires for the motor (probably the trickiest part) and remove the sticker cover on the motor to stick it to the "bug".  
Add small pieces of double sided tape and lay down one of the wires on the tape. Then have the kids stick the battery on top of the tape and use a second piece of tape to secure the top wire. 
At this point the bug bots should start dancing.  We used an upside down paper plate as a "sumo" rink to see which bug bot could stay on the longest.  
Overall this activity was easily complete in 15 minutes and the kids had something to take home with them.  Special thanks to ekaggrat at thingiverse for posting his 3D designs which made this project possible.

- Dirk

Coffee table drawer

The kids have really done a number on our living room coffee table.  The top has been "distressed"  by biting, thrown toys and lots of drumming.
The drawers have also been used as steps to get up on top of the table.  Most of the hardware components have broken under this level of used.  
I decided that this would be a fun project for my 3D printer.  There are a lot of drawer guides in thingiverse. I downloaded a few drawer guild stl files but none of them really fit my dawers:


I ended up having to design my own using a pair of calipers and OpenScad.  I think they turned out great:


I also replaced 3 of the four drawer stops using another design developed in OpenScad:

After the flat part was printed I put it in a warm pan on the stove to soften the plastic a little so I could put an appropriate bend in it. Here is a link to my files if you are interested in working with them:


I also posted them on YouMagine.org


Overall, I am happy with the results.  And I am comforted in knowing that I can replace the parts again if the kids get destructive again.

- Dirk

BackBlog - Teleporter video

We through a Star Trek themed surprise party for my wife and I thought it would be fun to see if I could make a transporter effect.
To start we took two pictures, one with everyone in an away team formation and one with just the background

I then wrote a simple program to add the two images together using a weighted sum.  This technique looked okay but I also wanted some noise.  I used the matlab imnoise function to create some sparkles. Inicially just a few, grow to a lot about halfway and then disparate as the people materialize.  

The trick is to get the speckles to only appear where there are people.  I could have tried some clever image subtraction trick to find the region that changed but it was just as quick for me to use GIMP to cut the people out and make a simple flag array using the following Matlab code.  I had to also use GIMP to paint over any white spots in the image. Fortunately for my image there was very little white. I ended up with the following (I guess I could also have just select the white and set everything else to black).


Now, potting All the components together and looping from 0 to 100 I was able to create a directory of images that I wanted and stitched the images together using ffmpeg.

To top it off,  I found a transporter like sound on the net and used my copy of Camtacia (http://www.techsmith.com/camtasia.html)  to put the audio and video together.
Here is my final product:


- Dirk

Sunday, June 22, 2014

Gears with logos

The theme for the kids VBS (Vacation Bible School) this year is "Workshop of Wonders" by Cokesbury.  I participate every year with my kids but was extremely enthusiastic that the theme this year was for makers so my goal is to show off the 3D printer and make some things for the 50 or so kid participants.  It's no fun watching a 3D printer without having something to touch and even take home.  However, I am fairly new to 3D print design so this was only my second endeavor to design something of my own.

I was trying to think of a project where each student would get a gismo to take home but we could put them all together to build something as a group. This fit in with the theme quite nicely however most of my ideas were a little too complex to get off the ground.

I finally settled on building gears with logos and holes on one end so they could attach them to their backpacks.  I thought I could assemble all of the gears together to make one big machine the kids could play with that all worked together.  With this plan in mind I searched though thingiverse and youmagin for some designs I could use as a starting point.  I was really excited when I found this one by http://www.thingiverse.com/thing:40410 that can be used to make gears that fit into Lego technics. I have a ton of lego technics and I really liked the idea that the motivated students to integrate their gear with their own legos.


After some iteration, I ultimately ended up doing is importing the images into Inkscape and converting them to a dfx file which is a vector map using instructions I found on a couple of website. Here is an example image I loaded into Inkscape


Using this technique I was able to make a variety of gears and they worked well with lego. Here is a video of one of the gears working with my old first generation mindstorm:

This turned out to be a really flexible design and I was also able to someone elses openscad files to make other gears with different projects I found on thingiverse. For example here is one with a robot in a openscad file from thingiverse http://www.thingiverse.com/thing:53285:

Here is another one from an stl file I found on youmagin that originally was a keychain modification for the ultimaker (https://www.youmagine.com/designs/ultimaker-key-fob-flat):

I really like this design because it is easy for me to swap out different logos based on the event.  I uploaded my source files and these examples to github:

https://github.com/colbrydi/gear-givaways

And posted a few on Youmagine.org

https://www.youmagine.com/designs/gear-givaways

Please let me know if you find this helpful and email me links to gears that you have made.

- Dirk

Milk Jug Bird Feeder

My eldest daughter wanted to make a birdhouse/feeder.  It was the middle of winter and I think she was thinking of building it out of wood. However, I realized what she really wanted to do was decorate it using some extra stickers she had.  So, we compromised and I cut out a hole in a washed out milkjug.  

She spent the afternoon decorating and had a lot of fun. 


Add a little birdseed and the project was complete.


Easy way to entertain a fidgety girl on a beautiful but cold afternoon.  The seeds ended up on the ground although I don't ever think I saw a bird.

- Dirk

Monday, June 16, 2014

Diet Coke and Mentos

As any true geek dad, I have always wanted to do the Diet Coke and mentos experiment.  However it is messy and the logistics of getting the mentos in the coke without getting crazy sticky is challenging.  I did a quick search of thingiverse and found a couple of wonderful solutions:
A short 3D print of the second one and all we needed was Diet Coke, Mentos, string, paperclip and space:


So much fun :)

- Dirk

Friday, June 13, 2014

Tripod Quick release mount

I got a tripod for my birthday this year.  It is a really nice one, but I lost the quick release mount.  Here is a picture with a quick release mount from another tripod. Obviously, it doesn't fit:

After some shopping online this one looks fairly good, but possibly not the right size.

http://www.tripodquickrelease.com/Acme_Lite_Quick_Releases.htm

So, I took some measurements and came up with this drawing

My goal is to see if I can print this out using a 3D printer. When I started this project I was planning to use the one in the engineering department where I work, but now I have an Ultimaker 2.  I know I need an stl file but I was not sure the best way to generate one. After some quick internet searching I found openscad.

http://www.openscad.org/

I downloaded the software and found the wiki quick start page.  It did not take long to figure out the simple language.  I started by making a cube and then creating the top.  Then I made objects to cut out the inside and the bevels.  Here is the resulting model.  


The hardest part was to get the surface normals for the wedge shape object to face in the right direction.  However, once I drew out my points and used the right hand rule things settled in nicely.  Openscad outputs stl files so all I did was import it into the cura program to generate the gcode for my printer and save it to the SD card to print.  The first print was a little too close to my tolerances and I could not get it to fit inside the tripod.  However, with some simple modifications to the openscad file I was able to generate a quick release mount that I think looks quite nice and works well:


A future design would fix the bottom to the mount somehow. I posted the STL and OpenScad files on YouMagin.org if you are interested in makeing your own:

https://www.youmagine.com/designs/tripod-quick-release-mount
   
- Dirk