Saturday, May 9, 2015

Intrducing a 3D printer to my daughter's Kindergarten class

We had fun showing off my 3D printer to the Kindergarten class.  Although the printer is fun to watch, kids tend to get board with it in just a few minutes.  I like to come up with classroom projects that let the kids use things that are printed with the printer. Since it is so cheep it is also fun to print something ahead of time that they can take home.

For the kindergarten class we printed some flowers that the kids could use to put together a cut spring  time flower pots just in time for mother's day:
 
It even lights up:
The kids had a great time. Here are some pictures


Turned out to be a lot of fun.  If you are interested in makeing your own here is a list of instructions on Instructables:

http://www.instructables.com/id/Spring-kindergarten-Class-Project-with-3D-Printer/

And the 3D files on YouMagine:

https://www.youmagine.com/designs/light-up-flower

Saturday, May 2, 2015

Ultimaker 2, cleaning a clogged nozzle

So my Ultimaker2 extruding head got clogged, really bad.  Something got jammed while printing and I could not get the filament to feed.  This had happened once in the past when I tried using some really cheap filament but I am not sure the real root of the problem this time.  In any case, I found using the "atomic" method for getting a clean nozzle. This method is named after MostlyAtomicBob who described the method for the first time in the following post:

http://umforum.ultimaker.com/index.php?/topic/3561-ultimaker-2-extruder-nozzle-blocked/#entry28940

Here is a summary of the steps that I used:

1) Remove the boden tube from the printer head
2) Heat up the head to full temperature (around 210 degrees) 
3) Push in a piece of spare filament until I can no longer push or it starts coming out the end.
4) Reduce temperature to around 90 degrees. Filament should solidify but stay a little soft.
5) Pull the filament out of the print head.
6) Repeat steps 2-5 until I get completely clean filament

You can see the result of my cleaning in the picture below. The pieces are a little backward and ordered from right to left.  Note the really dark char slowly going away and the pieces getting longer as they nest better and better in the print head. 


Here is the same procedure when it clogged a second time. This time I remembered to order them from left to right.


- Dirk

Electric box extender

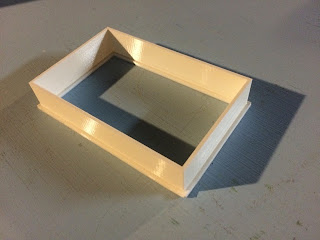
I have been having trouble with my 3D printer over the last couple of months. It turns out that the fans got disconnected. Once I fixed the problem my printer is working better than ever. I was itching for something to print so I came up with this simple spacer.

I installed a motion sensor in my basement because the light switch is in an inconvenient place and most of the time we go in this part of the basement my hands seem to be full. The motion sensor fixes this problem and even found a outlet plate on thingiverse that fit perfectly.

The only problem is that the installed switch box is too small for the new sensor and my printed play sticks out a good 15 mm from the box.


A few minutes with OpenScad and a two hour print later I have a nice looking solution.


Here is a link to the OpenSCAD file if you are interested in printing your own:

https://www.youmagine.com/designs/wall-switch-spacer

Easy and fun! Nice to have my printer back!

- Dirk